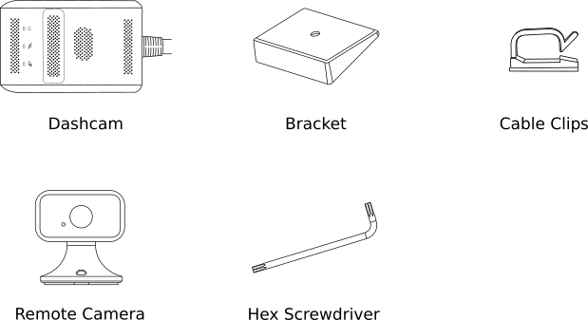
To install your road-facing dashcam and remote camera, you'll need the following:
-
- Cloth or wipe (optional)
Road-facing Dashcam
Locate your vehicle's diagnostic port and plug in your Dashcam power cable.
Run the cable up the dash and along the edge of the windshield to the upper center where you wish to install the dashcam to ensure you have enough cable for your desired route.
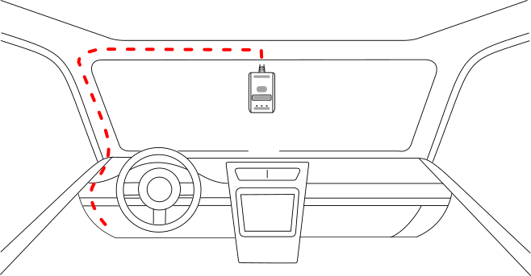
The dashcam should be installed with its lens at or above driver eye level. Select the proper installation position and wipe the glass clean.
Remove the protective film from the bracket mount and attach it to the clean windshield. Leave the bracket in place for 2 hours before attaching the camera.
Attach the camera to the bracket mount.

Use the included cable clips to secure the power cable in place.
Adjust the road-facing camera lens so it is pointing to the road at a slight down angle.
Remote Camera
You can place the remote camera to fit your needs. It can be attached to your dashboard or windshield as seen below. It can face inward to record the cabin, or outward to the road or blind spot as desired.
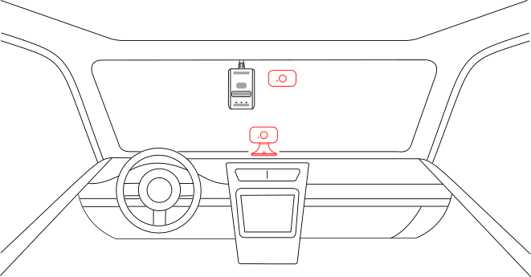
Select your desired remote camera placement and plug its cable into the matching cable connector on the main camera unit to ensure it will reach.
Wipe the installation surface clean before you remove the protective film from the camera base and attach the device.
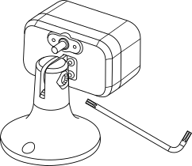
Adjust the camera head to the best angle for recording. Use the supplied allen wrench to tighten the set screw on the camera's base to keep it in place.
Connect to Dashcam
Once your dashcam is installed, start your vehicle's engine to boot up the camera and connect to it through the Blue Ink Tech app.
Download the Blue Ink Tech app on your Bluetooth- and WiFi-enabled phone or tablet. Be sure to agree to all of the Bluetooth and Location permissions during account setup so you will be able to connect properly.
Your BIT app will automatically begin connecting to the Dashcam through Bluetooth and then to the Dashcam's local WiFi network. Click "JOIN" when you see the popup message with the dashcam network.
You will be asked to add your vehicle to the app.
Check Camera Views
In the app, open the main menu and select Dashcam to finish setup. Tap the green gear icon and select Dashcam settings.
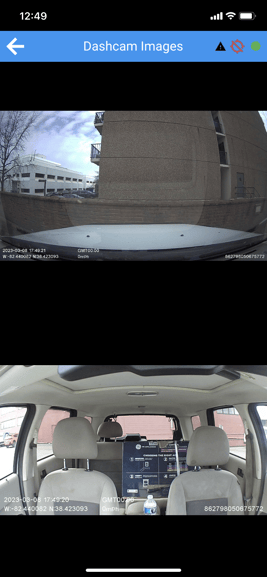
Tap the Take Image button to check the view from both cameras. Tilt the lens housing up or down on the road-facing camera to correct its view. Use the supplied allen wrench and set screw to correct the view on the 2nd camera.
You can also rotate both camera feeds on the Dashcam settings page if you have installed either camera sideways or upside down.
If you have your 2nd camera pointed at a side mirror you may want to use the 2nd Camera Mirror setting to flip the camera feed horizontally.